Set up Defects
- Defects are required for DMS data (Defect List Tests, Pass/Fail Tests, and Rating Tests).
- A Defect is one reason why you might fail a part or receive customer complaints.
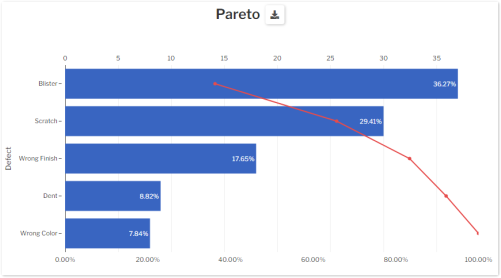
- Pareto analysis is typically based on counting Defects.
Creating, editing, or viewing Defects
To create, edit, or view a Defect:
- On the navigation menu
 , expand the Setup
  section. Then select Defects.
- This displays a list of all the Defects.
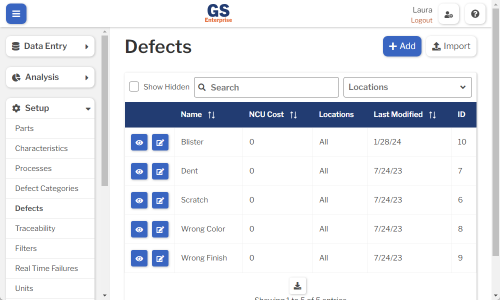
- To create a Defect, select the Add button.
- To edit a Defect, select the Edit
 button for that Defect.
 - To view a Defect, select the View
 button for that Defect.
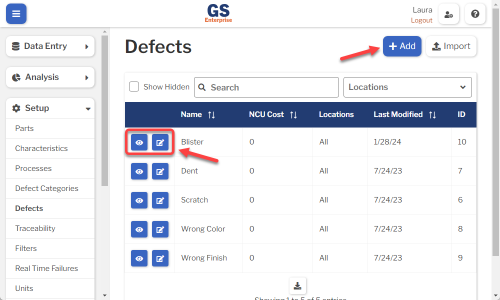
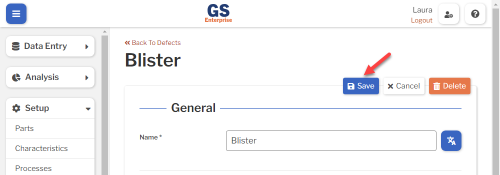
- To edit a Defect, select the Edit
- Set or change the Required settings (below) for that Defect.
- Set or change the Optional settings (below) for that Defect.
- Select the Save button at the top or bottom of the page to save your changes.
Required settings
Name
- Each Defect must have a unique name.
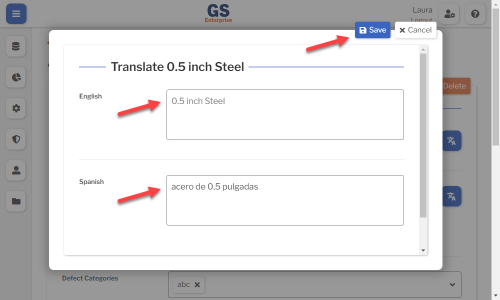
- You can translate this into another language (Spanish or English).
NCU Cost
- This is the cost of one nonconforming unit (defective part) that exhibits this Defect — for example, the cost to repair the defect or the cost to throw away the defective part.
- This value will be stored in DMS data records with this Defect, so changing this value will only affect new data records (and not existing data).
- If this is set to 0, you can't perform Cost analysis for this Defect.
Optional settings
Defect Categories
- Defect Categories are used by Inspections to display only a certain group (category) of Defects that are appropriate to that Inspection or to the Part being inspected.
- You can add this Defect to existing Defect Categories. To create new Defect Categories, use the Setup menu.
Locations
- If you want to limit which Locations can access this Defect for data entry and analysis, select them here.
- To let all Locations access this Defect, leave this blank.
- * Not shown if you only have one Location.
- * Not shown in GS Essential.
Hide in Lists
- When a Defect is no longer active, you can set Hide in Lists to Yes.
- This will hide the Defect from all lists of Defects in GS, while preserving any data that was already entered for this Defect. Users can still enter data for a hidden Defect if existing Inspection properties or Test properties specify this Defect.
- If you have hidden a Defect, you can always view it again by selecting the Show Hidden checkbox.
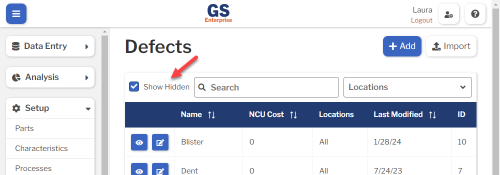
- To un-hide a Defect, set Hide in Lists to No.
Translating text into another language
- To translate a text field into another language (Spanish or English), select its Translate
 button.

- Enter your translated text, then select the Save button at the top or bottom of the window.
- For more information on translating text fields and changing the language displayed to the user, see Custom Translations.
Copying a Defect
- You can copy a Defect — including all of its settings — to a new Defect name.
- To copy a Defect:
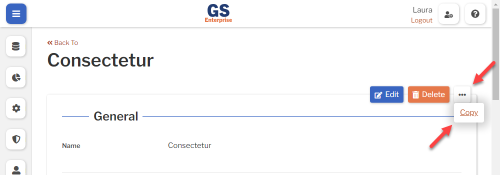
- On the list of Defects, select the View button for the Defect you want to copy.
- Select the More Actions
 button and then select Copy.
- Enter a New Name for the new Defect, and then select the Copy button.
- Edit any settings for this new Defect.
- On the list of Defects, select the View

Using a spreadsheet to create and edit Defects
- You can use a spreadsheet (.csv file) to create or edit multiple Defects and then import them.
- This can be much faster and easier than creating or editing those Defects one at a time in GS.
Deleting a Defect
- When a Defect becomes inactive, you will typically Hide it in Lists.
- However, if the Defect has never been used to enter data, is not assigned to any inspections, etc., you can delete that Defect:
- On the list of Defects, select the View button for the Defect you want to delete.
- Then select the Delete button
 at the top of the page.
- On the list of Defects, select the View