Set up Alerts
Introduction to Alerts
An Alert configures how to text or email someone if inspection data entry detects a real time failure.
In an inspection, any Test that can detect a real time failure can be set to use one of these Alerts.
Creating, editing, or viewing Alerts
To create, edit, or view an Alert:
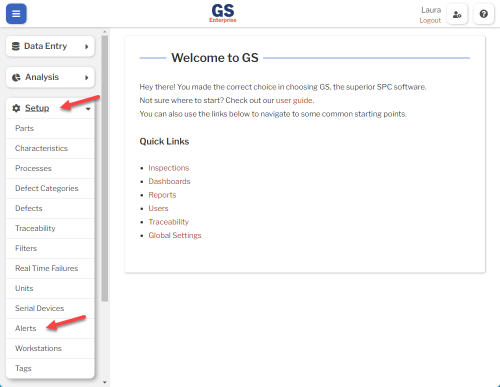
- On the navigation menu
 , expand the Setup
  section. Then select Alerts.
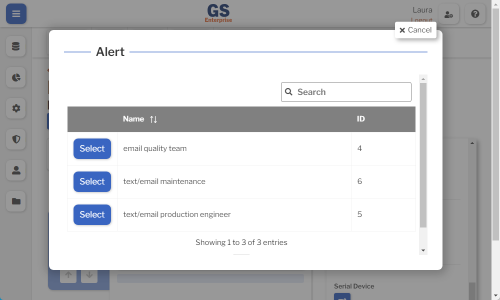
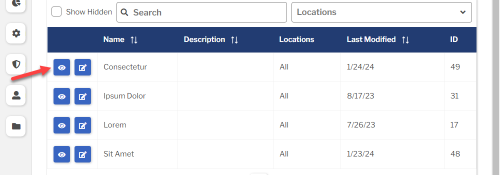
- This displays a list of all the Alerts.
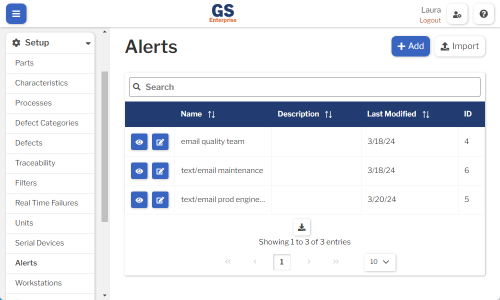
- To create an Alert, select the Add button.
- To edit an Alert, select the Edit
 button for that Alert.
 - To view an Alert, select the View
 button for that Alert.
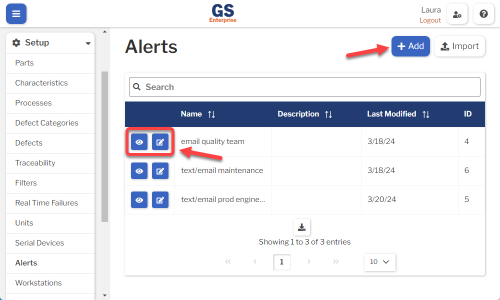
- To edit an Alert, select the Edit
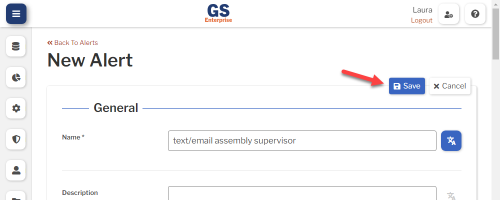
- Set or change the Required settings (below) for that Alert.
- Set or change the Optional settings (below) for that Alert.
- Select the Save button at the top or bottom of the page to save your changes.
Required settings
Name
Each Alert must have a unique name.
You can translate this into another language (Spanish or English).
Optional settings
Description
- A description or notes about this Alert.
- It is displayed only on this Setup Alert page.
- You can translate this into another language (Spanish or English).
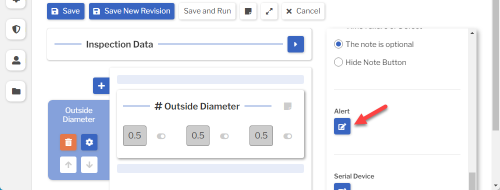
Include Linked Charts
If the Inspection displays a Chart that is linked to the Test that failed, attach that chart to emails.
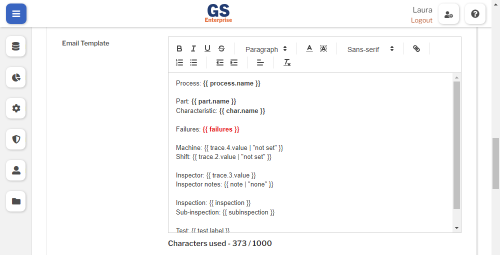
Email and Text Message
An Alert can send emails, text messages, or both.
You can use the Email Template and Text Message Template to create an email body that substitutes the values you need from the Test, sub-inspection, process, part, characteristic, traceability, notes, data values, and real time failures that triggered this Alert.
- Set email recipients for this Alert.
- You can add GS Users, Additional Emails for people without a GS login, or both.
- If you add GS Users, make sure that they are configured with email addresses.
- If you add an Additional Email, you can edit it to add an internal note about that email recipient.
- Use the Email Template to set the body of the email, which can be up to 1000 characters long. (The email subject will be "GS Real-Time Alert".)
- You can include keyword expressions to include values from the Test, sub-inspection, process, part, characteristic, traceability, notes, data values, and real time failures that triggered this Alert.
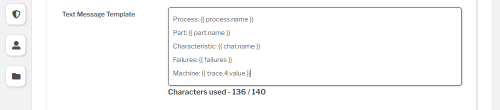
Text Message
- Set text message recipients for this Alert.
- You can add GS Users, Additional Phone Numbers for people without a GS login, or both.
- If you add GS Users, make sure that they are configured with phone numbers.
- If you add an Additional Phone Number, you can edit it to add an internal note about that text message recipient.
- Use the Text Message Template to set the contents of the text message, which can be up to 140 characters long.
- You can include keyword expressions to include values from the Test, sub-inspection, process, part, characteristic, traceability, notes, data values, and real time failures that triggered this Alert.
Template Keyword Expressions
Your Email Template or Text Message Template can include keyword expressions in double curly braces:
{{ subinspection }}
When GS sends the email or text message, each keyword expression in double curly braces will be replaced with the actual value of that expression - its output value.
Setting a default value
If a keyword or property might not have a value set, you can add a pipe character and then provide a default value within single or double quotes:
{{ char.name | 'No characteristic set' }}
{{ char.name | "No characteristic set" }}
![]() Be careful when copying from Word processing software, because it may change single and double quote characters into the "smart" version, which look nice but will not work.
Be careful when copying from Word processing software, because it may change single and double quote characters into the "smart" version, which look nice but will not work.
Wrong:
{{ char.name | ‘No characteristic set’ }}
To set a default value that contains a single or double quote character, use a backslash to escape the quote character:
{{ trace.1.name | 'The shift\'s operator is not set' }}
Any other backslash characters in the default value will be ignored.
The default value cannot contain another expression.
Wrong:
{{ char.name | 'No characteristic set for {{ test.label }}' }}
![]() While additional formatting is allowed in the templates (bold, italics, etc), make sure that expressions in double curly braces are not partially formatted. (This is because the formatting will insert extra characters.)
While additional formatting is allowed in the templates (bold, italics, etc), make sure that expressions in double curly braces are not partially formatted. (This is because the formatting will insert extra characters.)
Wrong:
{{ char.name }}
Keywords
Some keywords must be followed by a period and a property, while others do not:
{{ part.name }}
{{ subinspection }}
Whitespace inside of the curly braces does not matter.
{{part.name}}
{{ part.name }}
All keywords and properties are case sensitive.
The available keywords are:
Keyword: inspection
The inspection for the submitted Test that triggered this Alert.
This keyword will output the name of the inspection.
Example:
Input:
Inspection name: {{ inspection }}
Output:
Inspection name: My Inspection
Keyword: subinspection
The sub-inspection for the submitted Test that triggered this Alert.
This keyword will output the name of the sub-inspection.
Example:
Input:
Subinspection name: {{ subinspection }}
Output:
Subinspection name: Molding Checks
Keyword: test
The Test that triggered this Alert.
Properties:
The test keyword must use this additional property:
- label: The label of the Test.
Example:
Input:
Test label: {{ test.label }}
Output:
Test label: Widget width
Keyword: char
The Characteristic recorded by the Test that triggered this Alert.
If the Test that triggered this Alert is not an SPC Test, the output value will be the default value you specified (or nothing, if you didn't specify a default value).
All properties correspond to the field on the Characteristic, unless otherwise noted.
Properties:
The char keyword must use one of these additional properties:
- name
- description
- subgroupSize
- lowerSpec
- upperSpec
- xTarget
- lowerReasonableLimit
- upperReasonableLimit
- lowerFixedControl
- upperFixedControl
- lowerIndLimit
- upperIndLimit
- mav
- processTarget
- rTarget
- lowerRFixedControl
- upperRFixedControl
Example:
Input:
Triggered alert for {{ char.name }}, which has an upper spec of {{ char.upperSpec | 'N/A' }}.
Output:
Triggered alert for Bolt Length, which has an upper spec of N/A.
Keyword: process
The Process recorded by the Test that triggered this Alert.
All properties correspond to the field on the Process, unless otherwise noted.
Properties:
The process keyword must use one of these additional properties:
- name
- ncuCost
- sampleSize
- acceptableDefectPercentage
- goalYield
- acceptableYield
- acceptableAvailability
- acceptablePerformance
- acceptableQuality
- acceptableOEE
- goalAvailability
- goalPerformance
- goalQuality
- goalOEE
Example:
Input:
Triggered alert for the {{ process.name }} process, with an Acceptable Yield of {{ process.goalYield | 'No Acceptable Yield set' }}.
Output:
Triggered alert for the Molding Audit process, with an Acceptable Yield of 0.8.
Keyword: part
The Part recorded by the Test that triggered this Alert.
All properties correspond to the field on the Part, unless otherwise noted.
Properties:
The part keyword must use this additional property:
- name : The name of the part.
Example:
Input:
{{ part.name }} had a failure!
Output:
3 inch bolt had a failure!
Keyword: failures
The real time failures recorded by the Test that triggered this Alert.
Example:
Input:
The failures on the Test were {{ failures }}.
Output:
The failures on the Test were X Above Spec, X Above Control.
Keyword: note
The note recorded by the Test that triggered this Alert.
If the Test that triggered this Alert doesn't have a note, the output value will be the default value you specified (or nothing, if you didn't specify a default value).
Example:
Input:
The note logged for the failure was "{{ note }}".
Output:
The note logged for the failure was "the drive belt broke".
Keyword: values
The values recorded by the Test that triggered this Alert.
The output will vary based on the data type (SPC, DMS, OEE) of the Test.
Example:
Input (SPC):
The measured values were {{ values }}.
Output (SPC):
The measured values were 1.8, 2.7, 3.6.
Input (DMS):
The failure occurred with {{ values }}.
Output (DMS):
The failure occurred with Sample Size: 1, total defects: 10, total NCU: 4.
Input (OEE):
The OEE of the failure had {{ values }}.
Output (OEE):
The OEE of the failure had Scheduled Time: 10, Available Time: 8.
Keyword: trace
The traceability recorded by the Test that triggered this Alert.
Traceability must be accessed with the trace keyword, followed by the database ID.
Properties:
The trace keyword must use one of these additional properties:
- name : The name of the traceability.
- value : The value of the traceability recorded by that Test.
Example:
Input:
The {{ trace.1.name }} is {{ trace.1.value }}, and the {{ trace.2.name }} is {{ trace.2.value | 'not set' }}.
Output:
The shift is Shift 3, and the department is not set.
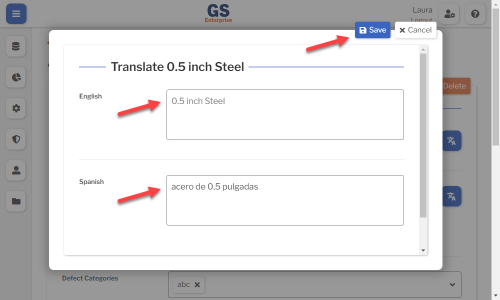
Translating text into another language
- To translate a text field into another language (Spanish or English), select its Translate
 button.

- Enter your translated text, then select the Save button at the top or bottom of the window.
- For more information on translating text fields and changing the language displayed to the user, see Custom Translations.
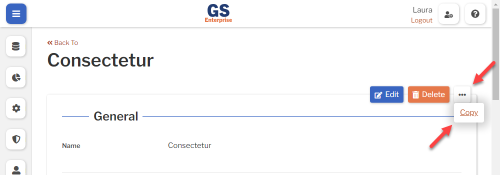
Copying an Alert
You can copy an Alert — including all of its settings — to a new Alert name. To do so:
- On the list of Alerts, select the View button for the Alert you want to copy.
- Select the More Actions
 button and then select Copy.
- Enter a New Name for the new Alert, and then select the Copy button.
- Edit any settings for this new Alert.

Using a spreadsheet to create and edit Alerts
You can use a spreadsheet (.csv file) to create or edit multiple Alerts and then import them.
This can be much faster and easier than creating or editing those Alerts one at a time in GS.
Deleting an Alert
![]() You should only delete Alerts that are not used by any inspections.
You should only delete Alerts that are not used by any inspections.
To delete an Alert that is not being used:
- On the list of Alerts, select the View button for the Alert you want to delete.
- Then select the Delete button
 at the top of the page.