Set up Characteristics
Characteristics are required for SPC measurement data.
A Characteristic is the dimension, property, or test result you are measuring for a Part — such as length, diameter, weight, density, force, resistance, and so forth. You will typically measure several Characteristics on a Part.
Creating a Characteristic requires you to set the subgroup size and unit of measure; you can also set specification limits and fixed control limits for a Characteristic.
Creating, editing, or viewing Characteristics
- You can create or edit a Characteristic from a Part page or from the list of all Characteristics in GS.
- To start from a Part page:
- View or edit a Part, then scroll down to the Characteristics section of that page.
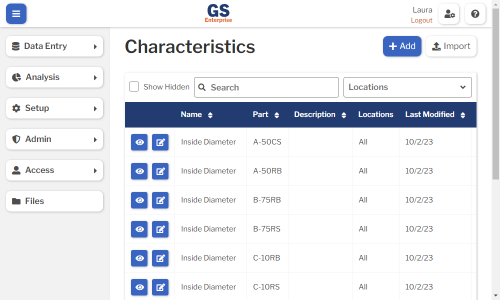
- To start from the list of all Characteristics in GS:
-
- On the navigation menu
 , expand the Setup
  section. Then select Characteristics.
- This displays a list of all the Characteristics.
- On the navigation menu
-
- To start from a Part page:
- To create a Characteristic, select the Add button.
- To edit a Characteristic, select the Edit
 button for that Characteristic.
 - To view a Characteristic, select the View
 button for that Characteristic.
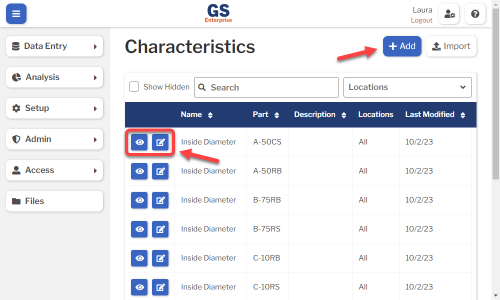
- To edit a Characteristic, select the Edit
- Set or change the Required settings (below) for that Characteristic.
- Set or change the Optional settings (below) for that Characteristic.
- Save your changes.
- If you changed any values in X Limits or Range Limits, you have the option to save a New Revision of this Characteristic.
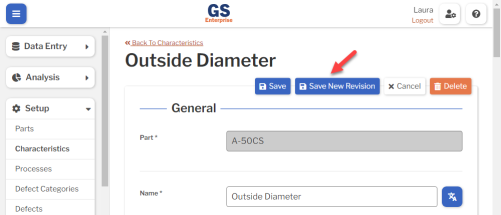
- If data is retrieved from more than one Revision, each revision is analyzed separately on charts and statistics.
- To save all of your changes as the current revision of the Characteristic, select the Save button at the top or bottom of the page.
- If you changed any values in X Limits or Range Limits, you have the option to save a New Revision of this Characteristic.

Required settings
Part
- If you started from the list of all Characteristics in GS, you must select a Part for this Characteristic.
- If the Part does not exist, can you create a new Part by selecting the Add button above the Part list.
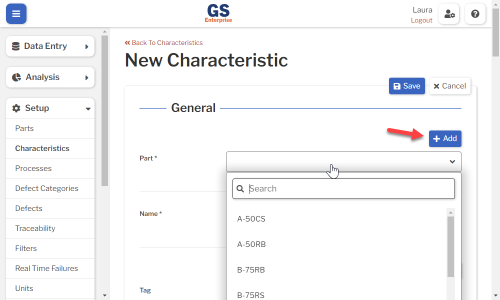
- If you started from a Part page, this is not displayed.
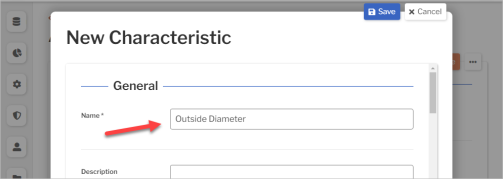
Name
- This should reflect the dimension, property, or test result you are measuring.
- You can translate this into another language (Spanish or English).
- This must be different from the Names of all other Characteristics for the same Part.
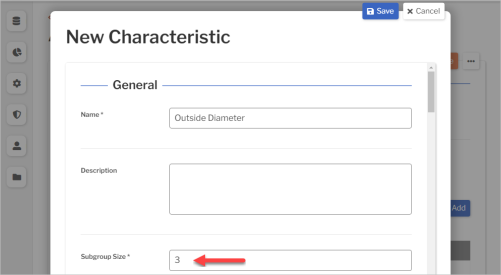
Subgroup Size
- This is the number of physical parts you will measure at one time and display as one plot point on a Control chart.
Range Type
- Choose how to chart and analyze this characteristic's data — as X-bar and Range, X-bar and Moving Range, or X-bar and Sigma.
- This will affect how GS calculates Control Limits for this characteristic.
- If Subgroup Size is set to 1, this is automatically set to Moving Range.
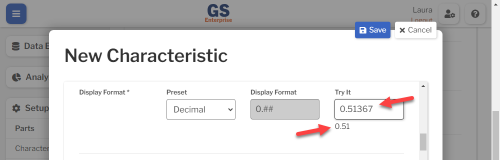
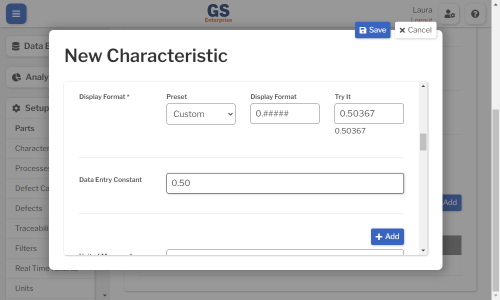
Display Format
- This setting determines how your measurements are formatted for this characteristic.
- It affects both data entry and analysis.
- To set the Display Format:
-
- Choose a Preset that best fits the data format for this characteristic.
-
- Decimal, Currency, Exponential Notation, and Percent will display up to two decimal places.
- Integer will not display any decimal places.
-
- Enter a sample measurement in the Try It box to view how the selected Preset will format the data.
- If needed, you can customize the format:
-
- Change the Preset to Custom.
- Edit the Display Format so that the result displays as you wish.
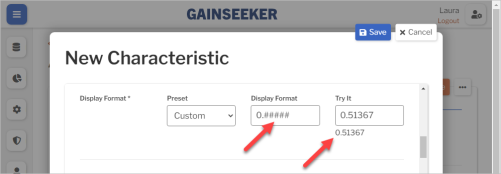
- Use # and 0 to display as many decimal places as desired.
- Longer values will be rounded to this number of decimal places.
- For example:
-
Try It Display Format formatted result 0.1369 0.### 0.137
- Use # to show a digit in that place only if that digit is not zero.
- For example:
-
Try It Display Format formatted result 0.13 0.#### 0.13
- Use 0 to always show a digit in that place.
- For example:
-
Try It Display Format formatted result 0.13 0.0000 0.1300 6.3 00.00 06.30 0.0532 00.0% 05.3% 69532 0.000E 6.953E4
- Use the decimal separator and thousands separator that match your browser locale.
- Other GS users will see the separators that match their browser locales.
- For more information, see Custom Translations.
- Use # and 0 to display as many decimal places as desired.
-
- Choose a Preset that best fits the data format for this characteristic.
-
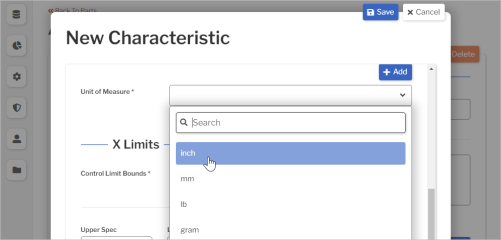
Unit of Measure
-
Select the Unit of Measure list and select the unit you need.
- If the unit you need isn't listed, select the Add button
 and enter the new Unit of Measure.
- You can also add measurement Units to this list by selecting the navigation menu , expanding the Setup section, and then selecting Units.
- You can also add measurement Units to this list by selecting the navigation menu
Control Limit Bounds
- If you choose Control limits cannot be less than zero, any calculated Lower Control Limit on the X-bar or X chart that is less than zero will be displayed as zero for charts and for the LCLx statistic.
- This setting does not affect any other statistics or chart limits.
Optional settings
Tag
- A Tag identifies what is being measured.
- This simplifies creating an Inspection for multiple Parts that all measure a Characteristic with the same Tag.
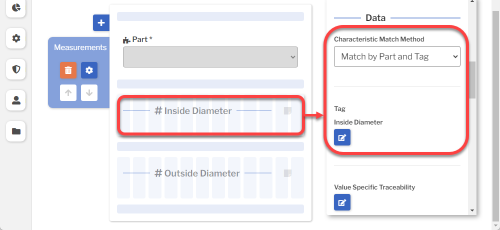
- If an appropriate Tag isn't listed, you can create a new Tag by selecting the Add button to manually enter it or the Autofill button to set the Tag to match the Characteristic's Name.
- You can also add Tags to this list by selecting the navigation menu , expanding the Setup section, and then selecting Tags.
- You can also add Tags to this list by selecting the navigation menu
Description
- This will be displayed on some lists of Characteristics.
- You can translate this into another language (Spanish or English).
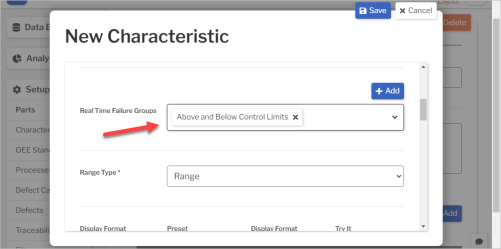
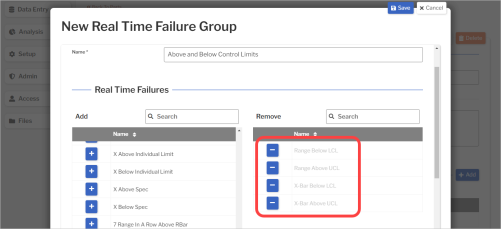
Real Time Failure Groups
- To alert the inspector when this characteristic is out of control, out of spec, and so forth, select the Real Time Failure Groups list and select the failure groups you need. You can also set up Alerts to send email or text messages when these real time failures occur.
- Each Real Time Failure Group is a collection of real-time checks.
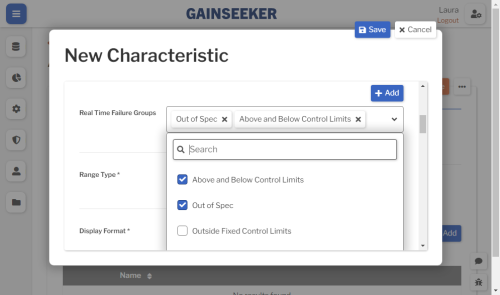
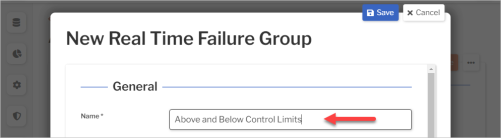
- If the Real Time Failure Group you need isn't listed, you can create a new Real Time Failure Group:
-
- Select the Add button to create a new failure group.
- You can also add failure groups to this list by selecting the navigation menu , expanding the Setup section, and then selecting Real Time Failures.
- You can also add failure groups to this list by selecting the navigation menu
- Enter a Name for this real time failure group.
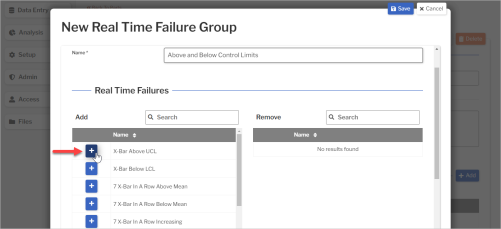
- In the Real Time Failures section, select
 to add a real-time check to this group.
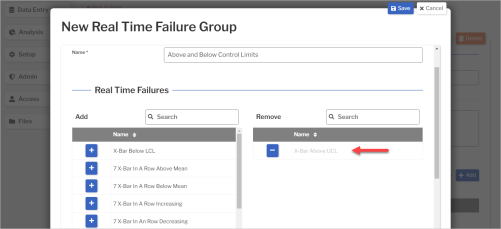
- Add other real-time checks for the group.
- When finished, select the Save button at the top or bottom of the page.

- The new real-time failure group is applied to the Characteristic you are creating or editing. You can also apply it to other Characteristics.
- Select the Add button
-
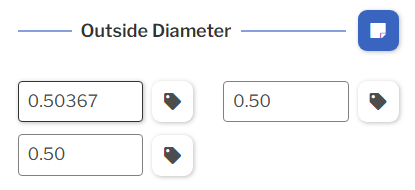
Data Entry Constant
- To simplify keyboard data entry when all values start with the same few digits, you can enter those digits here.
- During keyboard data entry, the inspector only needs to enter the remaining digits to complete each value.
Locations
- If you want to limit which Locations can access this Characteristic for data entry and analysis, select them here.
- To let all Locations access this Characteristic, leave this blank.
- * Not shown if you only have one Location.
- * Not shown in GS Essential.
Hide in Lists
- When a Characteristic is no longer active, you can set Hide in Lists to Yes.
- This will hide the Characteristic from all lists of Characteristics in GS, while preserving any data that was already entered for this Characteristic. Users can still enter data for a hidden Characteristic if existing Inspection properties or SPC Test properties specify this Characteristic.
- If you have hidden a Characteristic, you can always view it again by selecting the Show Hidden checkbox.
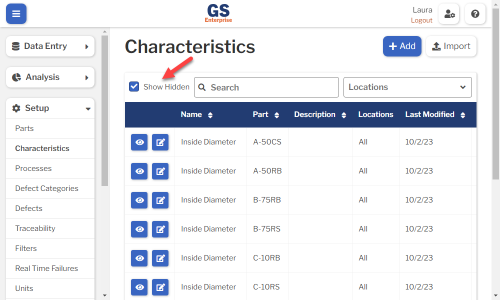
- To un-hide a Characteristic, set Hide in Lists to No.
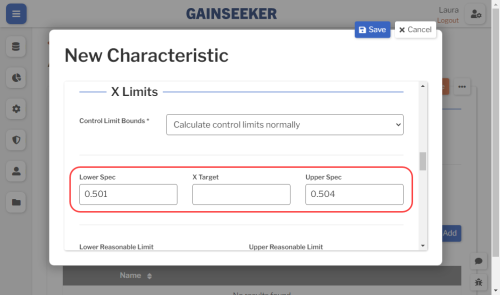
X Limits
All values can be reported as statistics and displayed on charts.
If you have a unilateral (one-sided) limit, just enter the limit you have and leave the other limit blank.
- These limits affect capability statistics like Cpk, Ppk, and so forth.
- If you enable a Real Time Failure Group that checks for X above or below spec, GS will check each measurement for Spec failures during data entry.
- Choose one of these two options for this setting:
-
- Set it to the the ideal value for this Characteristic.
- This lets you perform Short Run analysis for this Characteristic.
- Set it to the data mean for your X Fixed Control Limits (below).
- This is important if you are using the Global setting Fixed Control Limits for Real Time Failures and checking for N Points Above Or Below Center on the X-bar (or X) chart.
- Set it to the the ideal value for this Characteristic.

-
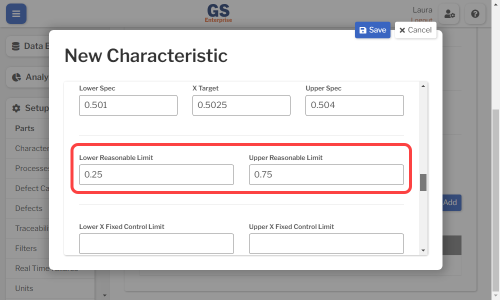
- This helps you prevent obvious typographical errors in measurement data.
- GS prevents the entry of any measurement below the Lower Reasonable Limit or above the Upper Reasonable Limit.
- If you have already established control limits for this characteristic, you can enter them here.
- If you enable a Real Time Failure Group that checks for X-Bar above or below fixed control limits, GS will check each subgroup average for X Fixed Control Limit failures during data entry.
- These can be used like Lower Spec and Upper Spec but do not affect capability statistics like Cpk, Ppk, and so forth.
- If you enable a Real Time Failure Group that checks for X above or below individual limits, GS will check each measurement for Individual Limit failures during data entry.
MAV
- Not used.
Process Target
- Not used.
Range Limits
All values can be reported as statistics and displayed on charts.
If you have a unilateral (one-sided) limit, just enter the limit you have and leave the other limit blank.
- Choose one of these two options for this setting:
-
- Set it to the the typical Range (or Moving Range) for this Characteristic.
- This lets you perform Short Run analysis for this Characteristic.
- Set it to the Range (or Moving Range) Mean for your Fixed Control Limits (below).
- This is important if you are using the Global setting Fixed Control Limits for Real Time Failures and checking for N Points Above Or Below Center on the Range (or Moving Range) chart.
- Set it to the the typical Range (or Moving Range) for this Characteristic.
-
- If you have already established control limits for this characteristic, you can enter them here.
- If you enable a Real Time Failure Group that checks for Range above or below fixed control limits, GS will check each subgroup range for R Fixed Control Limit failures during data entry.
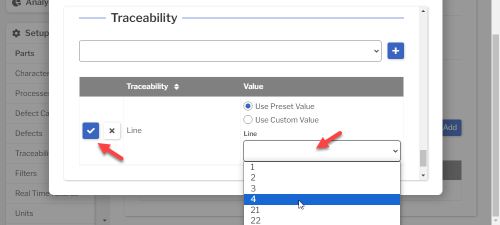
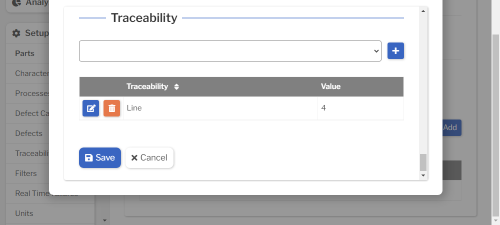
Traceability
- You can preset any Traceability field as appropriate for this Characteristic.
- For example, if this Characteristic is only produced on Line 4, you can preset the "Line" Traceability to 4.
- This makes it easy to to automatically set certain traceability values, such as a Line or Machine, every time data is entered for this Characteristic.
- To set traceability:
- Select the traceability and then select the Add button.
- Select a Preset value or enter a Custom value, then select the Confirm
 button.
- You can repeat these steps to set more traceability values.
- Select the traceability and then select the Add

Translating text into another language
To translate a text field into another language (Spanish or English), select its Translate ![]() button.
button.
![]()
Enter your translated text, then select the Save button at the top or bottom of the window.
![]()
For more information on translating text fields and changing the language displayed to the user, see Custom Translations.
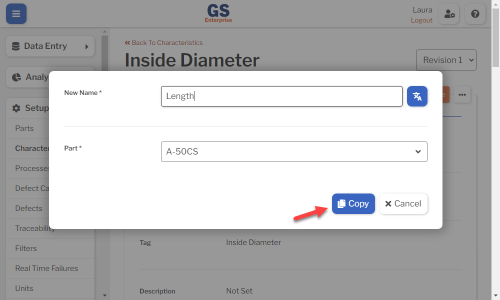
Copying a Characteristic
You can copy a Characteristic — including all of its settings — to a new Characteristic name, to a different Part name, or to both.
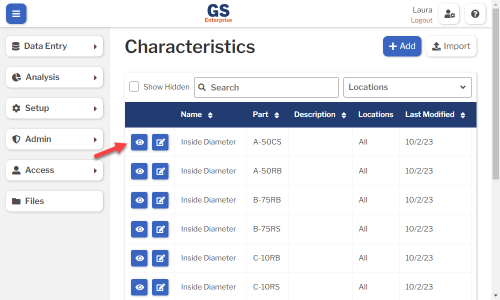
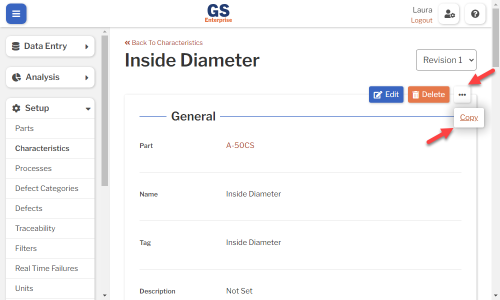
- On the list of Characteristics, select the View button for the Characteristic you want to copy.
- Select the More Actions
 button and then select Copy.
- For the new Characteristic, you must enter a New Name, select a different Part, or both.
- Then select the Copy button.
- Edit any settings for this new Characteristic.
Using a spreadsheet to create and edit Characteristics
You can use a spreadsheet (.csv file) to create or edit multiple Characteristics and then import them. This can be much faster and easier than creating or editing those Characteristics one at a time in GS.
Please note that there is a separate import for Parts.
Deleting a Characteristic
When a Characteristic becomes inactive, you will typically Hide it in Lists.
However, if the Characteristic has never been used to enter data, is not assigned to any inspections, etc., you can delete that Characteristic.
- On the list of Characteristics, select the View button for the Characteristic you want to delete.
- Then select the Delete button
 at the top of the page.