Set up Traceability
You can use Traceability to:
- Tag your data (measurements, defects, etc.) with values like Shift, Line, Machine, Operator, Work Order, and so forth.
- Filter your data by these Traceability values.
- Use analysis tools to identify potential sources of defects or measurement variation.
You can set up as many Traceabilities as you want.
![]() GS has built-in fields to tag your data with Process, Part, Characteristic, and Date/Time — so you don't need to add new Traceabilities for these values.
GS has built-in fields to tag your data with Process, Part, Characteristic, and Date/Time — so you don't need to add new Traceabilities for these values.
Creating, editing, or viewing Traceability
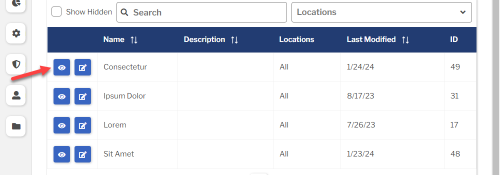
To create, edit, or view a Traceability:
- On the navigation menu
 , expand the Setup
  section. Then select Traceability.
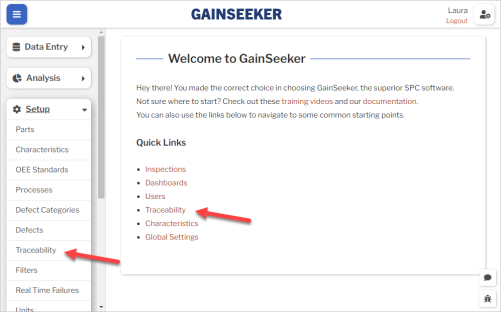
- Or select the Traceability link on the GS home page.
- This displays a list of all the Traceabilities.
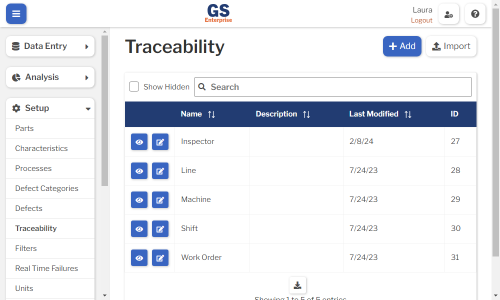
- To create a Traceability, select the Add button.
- To edit a Traceability, select the Edit
 button for that Traceability.
 - To view a Traceability, select the View
 button for that Traceability.
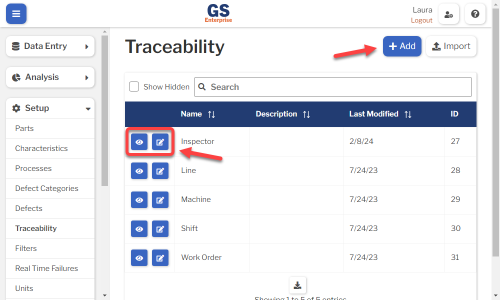
- To edit a Traceability, select the Edit
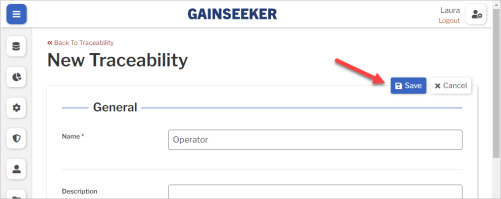
- Set or change the Required settings (below) for that Traceability.
- Set or change the Optional settings (below) for that Traceability.
- Select the Save button at the top or bottom of the page to save your changes.
Required settings
Name
Each Traceability must have a unique name.
You can translate this into another language (Spanish or English).
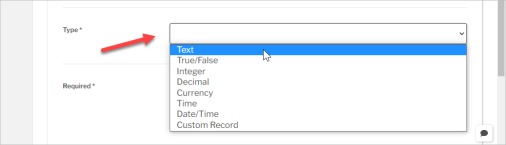
Type
Choose which Type of information can be entered for this Traceability — Text, True/False, Integer, Decimal, Currency, Time, or Date/Time.
![]() After you save a new traceability, you cannot change its Type.
After you save a new traceability, you cannot change its Type.
Text
All values entered in this Traceability field will be text.
This Type gives you additional settings for Preset Values (below), Restricted, and Text Options.
- (optional) Preset Values
- To standardize and simplify data entry, you can create a list of valid traceability values like this:
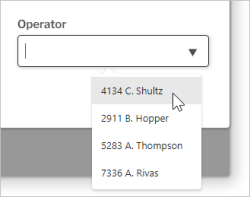
- To do so:
- Scroll down to the Restrictions panel.
- Type a Preset Value, then press the ENTER key or select the Add
 button.
- Repeat this step to continue adding Preset Values.
 Pro tip: You can narrow down this list for each data entry inspector by assigning them to a Group and selecting appropriate Preset values for each Group.
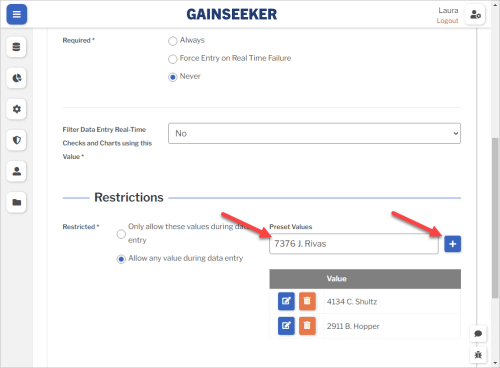
- (optional) Restricted
- To limit the inspector to the Preset Values list (above), select Only allow these values during data entry.
- Otherwise, select Allow any value during data entry (the default setting).
-
- This lets the inspector type a value or choose from the Preset Values list.
- To limit what the inspector can type, set the Text Options (below) for this traceability.
-
- (optional) Text Options
- This setting limits what the inspector can type for this traceability. It is only applied if Restricted (above) is set to Allow any value during data entry.
- You can easily set a rule restricting them to type text that:
- Begins With a specified Value
- Ends With a specified Value
- Contains a specified Value
- Has an Exact Length of a specified Value (integer)
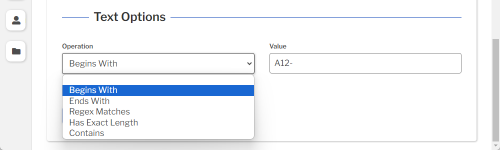
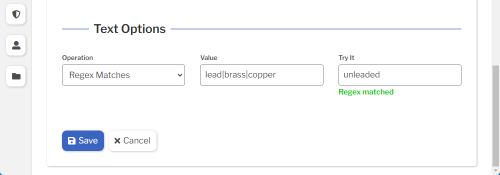
- To set multiple rules or to set a more advanced rule, choose Regex Matches and enter the regular expression that must be matched.
- You can try out different traceability values to make sure your Regex matches (or doesn't match) the traceability values you expect.
- Here are a few simple Regex examples (case sensitive):
-
Regex Description Example Regex Matches these values Does not match these values string value contains this string glue glue
ungluedGLUE
UNGLUED^string value begins with this string ^round rounds
roundedaround
out of round
ROUNDstring$ value ends with this string round$ around
out of roundrounds
rounded
ROUNDstr1|str2 value contains one of these strings lead|copper|brass 0.5-inch lead pipe
3-inch copper pipe
brass fitting 18Asteel pipe
LEAD PIPE^(?!.*(str1|str2)).*$ value does not contain one of these strings
(not simple, but useful.)^(?!.*(lead|brass)).*$ steel pipe
LEAD PIPE0.5-inch lead pipe
leader
plead
brass fitting 18A[abc] value contains one of these characters p[ae]st past
pestpost [^abc] value does not contain one of these characters p[^ae]st post past
pest - There are many Regex tutorials and references on the internet. Some that we like are regex101.com (Quick Reference), regexr.com (RegEx Reference and Cheatsheet), and codecademy.com (free tutorial).
True/False
During data entry, the inspector can only select True or False for this traceability.
Integer, Decimal, or Currency
Each value entered in this Traceability field will be a number. This can be:
- an Integer
- a number with Decimal places
- a number formatted as Currency
![]() GS analyzes these Types as numeric values that can vary — such as oven temperature, line speed, ambient humidity, and so forth. (For identifiers like user number, line number, tool number, and so forth, use the Text type instead.)
GS analyzes these Types as numeric values that can vary — such as oven temperature, line speed, ambient humidity, and so forth. (For identifiers like user number, line number, tool number, and so forth, use the Text type instead.)
These Types give you additional settings for Integer, Decimal, or Currency Options (below), Restricted, and Preset Values.
- (optional) Restricted
- You will typically select Allow any value during data entry (the default setting) for numeric traceability.
-
- This lets the inspector type a value or choose from the Preset Values list (below).
- To limit what the inspector can type, set the Integer, Decimal, or Currency Options (above) for this Traceability.
-
- The other option, Only allow these values during data entry, limits the inspector to the Preset Values list (below).
- You will typically select Allow any value during data entry (the default setting) for numeric traceability.
- (optional) Preset Values
- This lets you create a list of valid traceability values that the inspector can choose during data entry. The instructions to create this list are the same as for Text traceability.
- Numeric traceability is often configured with a Minimum and Maximum (above) instead of a preset list, because a list of all valid numeric values could be prohibitively long (both to set up here and to select from during data entry).
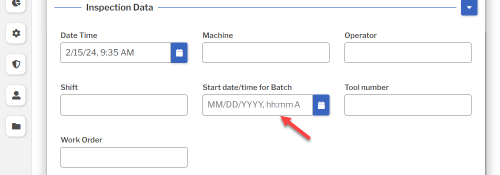
Time or Date/Time
Each value entered in this Traceability field will be a time or a date/time.
![]() This is separate from the built-in Date Time that GS stores with each data record.
This is separate from the built-in Date Time that GS stores with each data record.
This type of traceability is often used to mark the time that a process step began, or the "use by" date of a raw material.
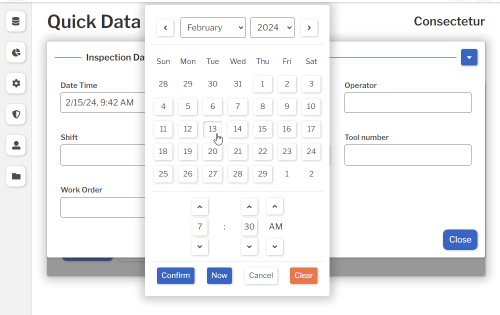
During data entry, the inspector can either type the value using the format provided (based on the browser's locale) or use the Date Time  button to select the value.
Required
This determines when GS will force the data entry inspector to enter a value for this traceability before they can submit data.
- Always — The inspector must always enter a value for this traceability before they can submit data.
- Force Entry on Real Time Failure or Defect — GS will only force the data entry inspector to enter a value for this traceability if the data being submitted has a Real Time Failure or a Defect.
- Never (the default setting) — The inspector is never forced to enter a value for this traceability.
Filter Data Entry Real Time Checks and Charts using this Value
This setting is used by Data Entry Inspections and Quick Data Entry. It is only applied when the Global setting Use Fixed or Dynamic Limits for Real-Time Failures is set to Dynamic.
It affects the way that GS retrieves SPC measurement data to calculate control limits for Data Entry charts and Real Time Failure checks:
- No (the default setting) — GS will retrieve the most recent 25 subgroups entered for the current Characteristic.
- Yes — GS will retrieve the most recent 25 subgroups entered for the combination of the current Characteristic and the current value of this Traceability.
For example:
- A Characteristic of a Part is produced by several machines. Some machines are older than others, and they all have different maintenance schedules, which causes each machine to perform a bit differently.
- For this situation, you can use a separate control chart for each machine during data entry by setting this to Yes for the Machine traceability. This lets GS detect control chart signals like runs and trends separately for each machine — signals that might not be detected on a control chart that includes all machines.
Optional settings
Description
- A description or notes about this Traceability.
- It is displayed only on this Setup Traceability page.
- You can translate this into another language (Spanish or English).
Hide in Lists
- When a Traceability is no longer active, you can set Hide in Lists to Yes.
- This will hide the Traceability from all lists of Traceabilities in GS, while preserving any data that was already entered for this Traceability. Users can still enter data for a hidden Traceability if existing Inspection properties or Test properties specify this Traceability.
- If you have hidden a Traceability, you can always view it again by selecting the Show Hidden checkbox.
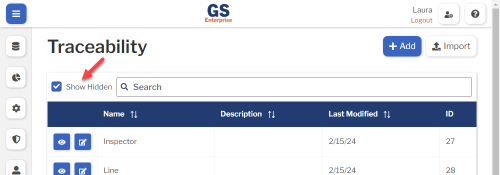
- To un-hide a Traceability, set Hide in Lists to No.
Translating text into another language
- To translate a text field into another language (Spanish or English), select its Translate
 button.

- Enter your translated text, then select the Save button at the top or bottom of the window.
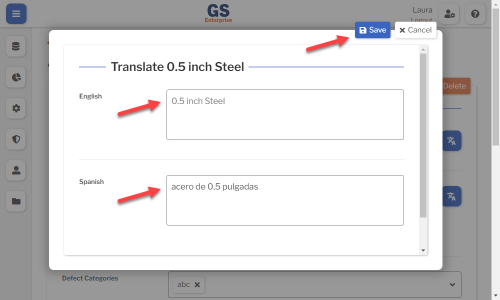
- For more information on translating text fields and changing the language displayed to the user, see Custom Translations.
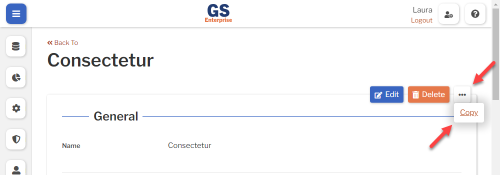
Copying a Traceability
You can copy a Traceability — including all of its settings — to a new Traceability name. To do so:
- On the list of Traceabilities, select the View button for the Traceability you want to copy.
- Select the More Actions
 button and then select Copy.
- Enter a New Name for the new Traceability, and then select the Copy button.
- Edit any settings for this new Traceability.

Using a spreadsheet to create and edit Traceabilities
You can use a spreadsheet (.csv file) to create or edit multiple Traceabilities and then import them.
This can be much faster and easier than creating or editing those Traceabilities one at a time in GS.
Deleting a Traceability
When a Traceability becomes inactive, you will typically Hide it in Lists.
However, if the Traceability has never been used to enter data, is not assigned to any inspections, etc., you can delete that Traceability:
- On the list of Traceabilities, select the View button for the Traceability you want to delete.
- Then select the Delete button
 at the top of the page.