Defect List Test
This Test stores Defect data.
Test Settings
Required Settings for this Test are:
Label
The label displayed above this Test.
You can translate this into another language (Spanish or English).
Visible
When this Test is not Visible, it will not be displayed to the data entry inspector.
Enabled
When Enabled, the data entry inspector can set or change its value.
If you use Inspection Scripts to set this Test's value, you might want to clear this checkbox so that the data entry inspector can't set or change its value.
Script ID
This is used by Inspection Scripts to identify this Test.
Required
The data entry inspector cannot Submit the Sub-Inspection if the Sample Size or NCU is blank.
Defect Category
Select the Defect Category that contains the Defects you want the data entry inspector to look for.
![]() This Setting is required.
This Setting is required.
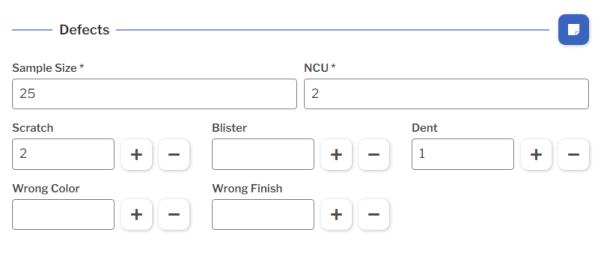
Sample Size
Specify the number of items that will be inspected for this Test.
![]() Sample Size is used to report statistics such as Yield, ratios of Defective parts to Total parts (such as Percent NCU, PPM, and NCU Sigma), and ratios of Total Defects to Total parts (such as Percent Defects, DPM, and Defect Sigma).
Sample Size is used to report statistics such as Yield, ratios of Defective parts to Total parts (such as Percent NCU, PPM, and NCU Sigma), and ratios of Total Defects to Total parts (such as Percent Defects, DPM, and Defect Sigma).
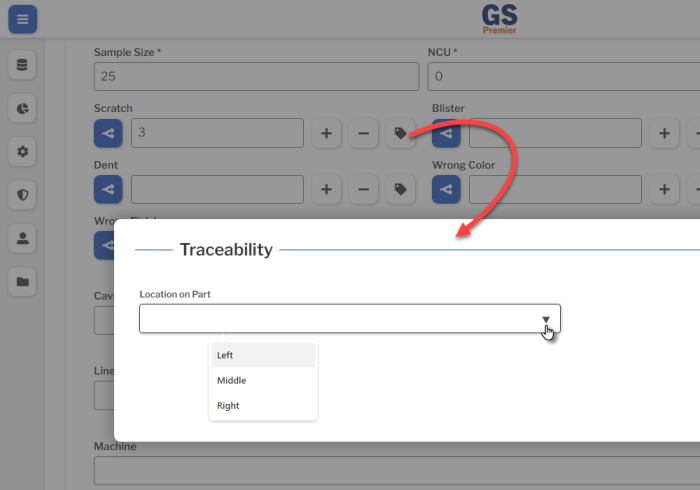
Defect Specific Traceability
This Setting lets you tag each Defect with its own Traceability value.
When you choose one or more Traceabilities for this Setting, the data entry inspector can select an Options button  to set an individual Traceability value for each Defect found.
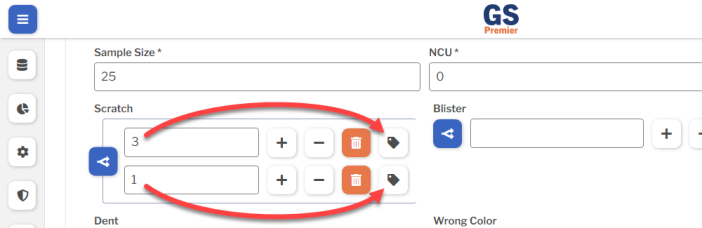
If one Defect is associated with multiple Traceability values, the data entry inspector can select the Add button  and tag different counts with different Traceability values.
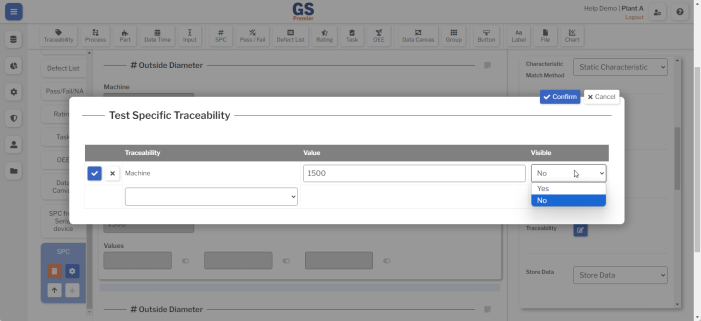
Test Specific Traceability
This Setting lets you set a Traceability value for only this Test on the Sub-Inspection.
If used, this Traceability value will override any other value set for this Traceability via a Traceability Test, User Setting, and so forth. For details, see Automatically setting Traceability values.
To set Test Specific Traceability:
- Select which Traceability to set.
- Set a Value for the Traceability, or leave the Value blank to let the data entry inspector enter the Value.
- Choose whether to make this Traceability Visible or hide it from the data entry inspector.
- If desired, you can add more Test Specific Traceabilities using the steps above.
- Select the Confirm button
 when finished.
Store Data
If using Inspection Scripts for this Inspection, you might want to use this Test to hold intermediate values but not store them in GS.
Your options are:
- Store Data (the default)
- Do Not Store Data — Use all of the GS features for this Test, and do not store its data in GS.
- Bypass Validity and Do Not Store — Turn off all GS validation checks for this Test, and do not store its data in GS.
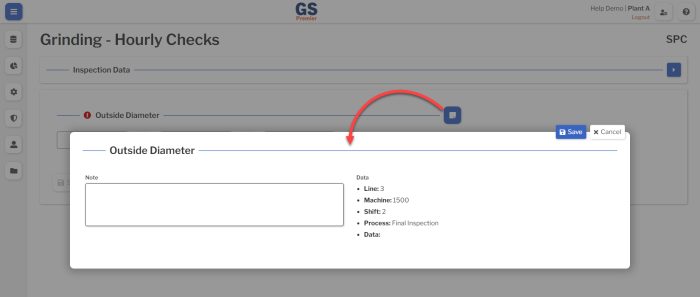
Note Button
This Setting affects the Note button  for this Test.
It determines whether GS uses the Inspection Setting, requires the data entry inspector to enter a Note before submitting a Sub-Inspection, makes the Note optional, or hides the Note button.
When available, the data entry inspector can select this button and enter a text Note for this Test.
Alert
You can choose an Alert that will automatically send a text message or email if this Test detects a real time failure.
Enable Sample Size
When Enabled, the data entry inspector can set or change the Sample Size during data entry.
If the data entry inspector always checks the same number of items for these defects, you might want to clear this checkbox so that the data entry inspector can't change the Sample Size you have preset for this Test.
NCU Behavior
To let the data entry inspector manually enter the number of bad parts (NonConforming Units or NCU), choose User Input.
To let GS automatically set the number of bad parts (NCU) equal to the number of Defects found in the Sample, choose Auto Sum. You should only choose this option if one bad part can be assigned a maximum of one Defect.
To use Inspection Scripts to set the number of bad parts (NCU), choose Script Controlled.
![]() NCU is used to report statistics such as Yield, Percent NCU, Percent Good, PPM, and NCU Sigma.
NCU is used to report statistics such as Yield, Percent NCU, Percent Good, PPM, and NCU Sigma.
Border
Add borders to the edges of this Test.
Freeze Test
If this Test is placed on the same row as a longer Test, it will not scroll off the screen until the longer Test scrolls off the screen.
Translating text into another language
To translate a text field into another language (Spanish or English), select its Translate ![]() button.
button.
![]()
Enter your translated text, then select the Save button at the top or bottom of the window.
![]()
For more information on translating text fields and changing the language displayed to the user, see Custom Translations.